Saturday, March 24, 2012

Smiling Big....


Hello Friends,

Today I am Smiling Big because of all of you... Thank you so much for helping me hit my goal. I am so touched and thrilled.... that I want to send one of you a little happy.... Here is what you need to do...
  1. be a follower of my blog and leave a comment = one chance
  2. share my blog on your blog = one chance
  3. share my blog on FB =one chance
  4. leave a comment for each with links to the shares
  5. come back on March 28 @ 8:00P.M. California time to see if you won.

Pretty easy right? Good Luck to all of you...

The 12x12 page at the top is of my daughter Tina. I used Fancy Pants Designs, Inc paper line ABOUT A GIRL. I really like how it turned out. Thanks for stopping by today.


Hugs~~
Molly

Monday, March 19, 2012

Graphic 45 Frame


Happy Monday Everyone.

I hope you had a great weekend.

Today I want to share an altered frame that I did using papers from Graphic 45. I used their
Le' Romantique line it is so beautiful.


I started with a plain little frame, added in some fantastic paper, a little chipboard, paint, ink,
Helmar glue, and walla a beautiful little piece of art.


I hope you like it. Thanks for stopping by today.

Hugs~~
Molly

Saturday, March 17, 2012

Green Brooch

Happy St. Patrick's Day Everyone.

Those of you who stopped by for Playing with Resin will remember seeing this....


I had made a shamrock with hot glue and filled it in with resin I had put green mica in. I let it set up for a few hours and tried to remove the hot glue but couldn't just pull it away I had to cut it away which was easy since the resin hadn't set up all the way. Here is the brooch all finished..


Thanks for stopping by today. I hope you like it.

Hugs~~
Molly

Thursday, March 15, 2012

The almost green rug...

So with keeping with my Week of Green I **died** two rugs...


OK this didn't go quite as planned....I bought these two very white bathroom rugs, with a slight pink stripe down the middle, on clearance at a local Home Goods store for $8 each (this is a deal if you've ever priced these foam mats)


My idea was to take these two rugs and paint/die them...sounds easy right? I washed them first, (pink stripe still there) and after letting them dry, which took forever, I go to work hand painting the leaf detail on them. I used a watered down version of the dye for the leaf painting and then went back in with full strength die to give some low lights.


After 4 hours of sitting on the driveway I get my daughter Tina to come out and help me. We have a good time talking and joking around about how unlikely this was going to work but we kept going. (These rugs are planned to go into her bathroom.)


I let them dry for 2 days. I was really hoping that if I gave it a lot of time that the die would stay. These rugs are made of polyester and it says right on the RIT die container not to use on polyester.....
BUT hey they are talking to me, cause I have this GREAT idea...


Today was dieing day. I got my supplies out and put my gloves on. Reading the directions you need to wet the fabric before placing each rug in the die bath. I lightly mist each rug with water and instantly the die is going everywhere. This doesn't look good for my 5+ hours of hand painting...I put both rugs in the bath for about an hour each. I left them in the sun, full of the die water, once again hoping that if it sits, it will take the die better.


I brought them in and put them into the washer and laundered them following the directions on the bottle....


And here are my slightly green/blue rugs in my daughters bathroom.


This was not what I had in mind but they still look better then they did with the pink stripe. What did I learn? Well I learned if it says something on the bottle, they probably know what they are talking about. LOL Oh well. Live and learn. I hope you enjoyed and learned from my mistake. Thanks for stopping by today.

Hugs~~
Molly

Wednesday, March 14, 2012

Playing with Resin

Have you ever played with Resin? Well I did tonight and what a blast. I hadn't played with Resin since junior high school when we had to take Shop class. Let me tell you it’s much more fun when you get to do what you want to do, and not what the teacher is telling you to make.

I started out by getting my supplies together, picking the paper was the hardest part. I choose to go with one of my favorite companies October Afternoon and their Sidewalks collection. I also opted to use a bottle cap so I could make a magnet.

I choose what images I wanted and placed them in the bottom of the bottle cap, the background piece and the bird are both stickers, while the M pattern piece is cardstock. I then mixed the two part resin together and poured some of it in to the bottle cap. I used a tooth pick to adjust the images the way I wanted and added a few micro beads in pink and blue. I let that set up for a while and then added a small blue feather and more resin. I added a small magnet to the back and this little birdie has found a new home on my desk lamp.


I love the way it turned out......

I did stay true to my green week tonight by making this piece…it needs more time to set up so check back in tomorrow to see it finished.


Hugs~~

Molly

Challenge Green


While I was thinking about this "week of green" for my blog, I thought I'd do a personal challenge along with it, you know to get me to think out of the box, and use what I have. So looking around my office I decided I would make a wreath out of coffee filters, felt shapes, and shoe laces. I know sounds strange, but that's what I had, so off I started.

I took the coffee filters, (I wanted to jazz them up) so I got this great idea to punch around the outside of some of them with my new Lucky Punch 8 by We R Memories Keepers....but coffee filters are like tissue paper, as a result using punches can be a bit tricky...I did a few by stacking them up to "create" a thicker like paper, but they still got stuck, so after a few I changed my mind that they look fine just the way they were...LOL.

I made the filters green by adding a few drops of reinker to a little water and laid the filters in it. I choose 3 colors thinking that I would be able to get definition on the wreath by placing the dark ones on the outside and the inner side of the wreath…well that didn’t work so well…you see sometimes the colors don’t turn out the way you think they will…why, you ask…well when you put water based ink in water; it dilutes the color and can also bring out other pigments used in that color… for example when you use a dark green it can turn a little turquoise ((not really a St. Paddy’s Day color)) and then other colors if they are close to each other will look awesome when dieing them, but after the dry over night, you really can’t tell them apart and they fade A LOT!! But I digress…back to the wreath

I now take the beautifully died filters and glue them to a wood wreath shape. I cut up the shoe laces and loop them into the wreath to look like ribbon, add the felt shapes and stand back…it still needed something…GLITTER!! Yes that’s what it needs, so I added a little glitter…now that looks great. Here is the finished wreath hanging on the door.

I hope you enjoyed today’s blog.

Tuesday, March 13, 2012

My Green for the day...

My "little green" for today is a sign I made for my boss. They moved over the weekend and I wanted to make sure she had a little Irish blessing for the new house, and what could be more appropriate with St Patrick's Day coming.


thanks for stopping by today.

Hugs~~
Molly

Monday, March 12, 2012

A Week of Green

Failte!!

Welcome to a Week of Green. With St. Patrick's Day on Saturday I wanted to get us all in the mood with a little green-a-day so make sure you check back often this week, I have lots planned.


So today's green is a cute little tag that I made using the resist technique. I stamped the image with Versa Mark and embossed it with clear powder. I then distressed the tag using Tim Hotlz stain and other inks. I added some trim and then a sentiment that means a lot to me. I hope you enjoy and get inspired to go green this week. Use what you have in your stash and make something green..Let's get this party started.

Hugs~~
Molly

Friday, March 9, 2012

Happy Birthday Terri Sproul

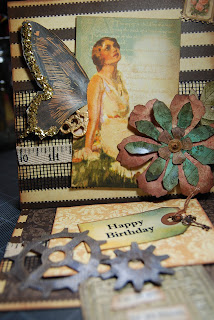
Here is a card I made for my dear friend Terry Sproul. She is celebrating her Birthday with a challenge on Viva Las Vegastamps!


Most of the paper is from Graphic 45. I used Terri Sproul's Mixers on the wings. I love how they turned out. Happy Birthday Terri, hope you like the card.

Hugs~~
Molly

Old hat = new uses


Today I am sharing a little project I worked on this week. Turning a old hat into a wearable piece of fun art. I saw this at the Scrapbook Expo in Anaheim a couple of weeks back. I got the supplies from a online store called Buy The Yard Ribbons they have some of the yummiest ribbon trims I have ever seen. So I started with this old hat, some leftover trims from other projects, and my favorite glue by Helmar.....and I went to work.

After I got the flowers on I thought it could use a little sparkle so I added a few rhinestones. I am not the best at just eyeballing it so I gave myself a little guild using a white crayon....


This is my Beautiful daughter wearing the finished project, we both think it turned out great. Thanks for stopping bye.

Hugs~~
Molly

Tuesday, March 6, 2012

Another Canvas


Happy Tuesday everyone. Today I want to share a canvas that I did awhile ago. This was my first canvas that I did using multiple techniques and mediums. This canvas was inspired by Donna Downey. I used acrylic pants, water, stamps, the chipboard swirls and alcohol inks are by Tim Holtz, some of the flowers are by Prima Flowers and rhinestones. The coloring on the chipboard and on the hanging crystal droplets, was done using the alcohol inks. I hand painted the word ART and then added a rub on along the side of the A. All 3D elements are put on using Helmars glue.

I hope you enjoy.
Have a great day.

Monday, March 5, 2012

Graphic 45

Welcome back to my blog everyone. I hope you had a fabulously crafty weekend, I know I did. This weekend I played with my new paper and stickers that I won from Graphic 45. It was so much fun.
This is what I won....they are so generous.


It was so easy to come up with fun projects using these great papers. The first project I did was this Baby card. I love the way it turned out. I used the new Little Darling paper line. This line is so beautifully done that it takes no time at all to come up with beautiful cards.


Saturday, March 3, 2012

Molly meets Tim Holtz


Here is another project that I have been working on....a “shrine” (as my hubby calls them) this one is for Tim Holtz. I meet Tim while at CHA. It was truly amazing to meet him. He was very encouraging when I told him that I was about to launch my blog, and put my art out there... I hope that if he ever gets the chance to see this project, that he would be pleased with what I did and how it turned out.


I altered the frame, it was originally silver, using Distress Paint metallic gold. I altered the mat using distress ink with an applicator and then spritzed it with water to get an aged feeling. I then matted the photo and autograph on black paper and double foam mounted them to recess them. I then used a small collection of Tim’s products for the middle cut out. I finished it by making a few accessories to put around the edges.
I hope you like it.